캐릭터 이동
기본적으로, InptutAction을 사용해 좌우 이동과 점프를 구현한다.
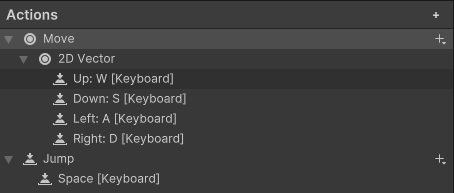
선언해주어야 할 변수들이 많다.
- speed : 이동속도
- JumpSpeed : 점프 했을 때의 이동속도
- MoveInput : inputaction(Move)를 입력받을 변수
- JumpInput: inputaction(Jump)를 입력받을 변수
- rigidbody : 점프 시, 힘을 주기 위한 rigdbody값
- spriteRenderer : flip을 하기 위한 변수 선언(왼쪽 오른쪽 바라보게 하기 위한)
- animator : 애니메이터를 받아오기 위한 변수 선언
- Grounded : 점프 조건을 설정하기 위한 변수 선언
- mainCamera : 카메라 변수 선언
- CameraSpeed : 카메라 이동 속도 변수 선언
- MaxDistace : 카메라가 일정 거리 이상 떨어지면, 속도를 올리기 위한 변수 선언
- cameraOffset. : 카메라가 기본적으로 있는 위치를 위한 변수 선언
- Speed1 : Animotor의 parameter를 받을 변수
public class CharController : MonoBehaviour
{
    private static readonly int Speed1 = Animator.StringToHash("Speed");
    //private static readonly int Ground = Animator.StringToHash("Ground");
    [SerializeField] private float Speed = 5.0f;
    [SerializeField] private float JumpSpeed = 15.0f;
    [SerializeField] private Camera _mainCamera;
    [SerializeField] private float CameraSpeed = 4.0f;
    [SerializeField] private float MaxDistance = 4.0f;

    private Vector3 cameraOffset;

    InputAction Move_Input;
    private Animator _animator;
    private Rigidbody2D _rigidbody;
    private SpriteRenderer _spriteRenderer;
    private InputAction Jump_Input;

    private bool Grounded = true;
Start() 함수에서 , 할당해주어야 할 변수들 (rigidbody, animator, spriteRenderer) 를 선언해주고
InputSystem에서 Input을 받아와 Move와 Jump input에 할당해준다.
        _animator = GetComponent<Animator>();
        _rigidbody = GetComponent<Rigidbody2D>();
        _spriteRenderer = GetComponent<SpriteRenderer>();
UnityEngine.InputSystem.PlayerInput Input = GetComponent<UnityEngine.InputSystem.PlayerInput>();
Move_Input = Input.actions["Move"];
Jump_Input = Input.actions["Jump"];
그리고 기본 카메라의 위치를 찾아준다.(캐릭터와 떨어진 정도)
cameraOffset = _mainCamera.transform.position - transform.position;
Update() 함수에는 캐릭터 이동 관련 함수들을 넣어준다.
Move_Input값을 받을 moveValue를 설정해주고(우리가 value 값으로 설정했다, jump는 버튼)
Vector2 moveValue = Move_Input.ReadValue<Vector2>();왼쪽과 오른쪽으로 이동 중일 때에 서로 다른 방향을 바라보고 있어야 하므로
1번 줄은 이동중일 때
2번줄은 moveValue.x < 0이면, 즉 왼쪽으로 가고 있으면 flip해라 라는 코드
   if (moveValue.x != 0)
            _spriteRenderer.flipX = moveValue.x < 0;
애니메이터가 speed가 0이 아니면 재생되도록 값을 보내준다.
_animator.SetFloat(Speed1, Mathf.Abs(moveValue.x));*SetFloat : float값을 parameter에 영향을 주는 float 값을 보냄
moveValue가 힘을 받는 방향으로 rigidbody에 속력을 준다. (y값은 변화 x)
_rigidbody.velocity = new Vector2(moveValue.x * Speed, _rigidbody.velocity.y);
이제 점프를 구현할 차례이다.
점프를 할 때에는 발이 바닥에 닿아 있어야 한다. (더블 점프 문제를 해결하기 위해)
1. Raycast 사용 : 바닥으로부터의 거리 측정, 일정 거리 이하면 Grounded(땅에 닿아 있음)
2. 새로운 게임 오브젝트를 발바닥면에 설정함, collider로 Grounded 체크
우선 사용해볼 방법은 Raycast이다.
Raycast는 간단히 말해 광선을 쏴서 충돌을 체크하는 것이다.
Raycast로 광선을 쏴서 지면까지의 거리를 측정하고 , 일정 거리 이하면 점프를 시킨다.
그리고 점프한 후에는 다시 내려올 때까지 점프가 되지 않도록 Grounded 상태를 false로 바꿔주어야 한다.
이는 코루틴 함수에서 넣을 것이다.
 if (Jump_Input.triggered && Grounded)
        {
            Debug.Log("Jump");

            RaycastHit2D hit = Physics2D.Raycast(transform.position, Vector2.down, Mathf.Infinity, 1 << LayerMask.NameToLayer("Tile"));
            Debug.Log(hit.distance);
            if (hit.distance <= 0.00)
            {
                _rigidbody.AddForce(Vector2.up * JumpSpeed, ForceMode2D.Impulse);
                _animator.CrossFade("Alchemist_Jump",0.0f);
                StartCoroutine(JumpEndCheck());
            }
        }
JumpCheck라고 이름지을 코루틴 함수는 점프를 하면 실행되는 함수이다.
따라서 Grounded 상태를 바꿔주고, Jump가 끝나면 다시 Grounded 상태를 true로 바꿔주어야 한다.
똑같이 Raycast를 사용해 일정 거리 이하면 변경해준다.
 IEnumerator JumpEndCheck()
    {
        Grounded = false;
        yield return new WaitForFixedUpdate();

        while (true)
        {
            RaycastHit2D hit = Physics2D.Raycast(transform.position, Vector2.down, Mathf.Infinity, 1 << LayerMask.NameToLayer("Tile"));

            if (hit.distance <= 0.00)
            {
                _animator.CrossFade("idle",0.0f);
                break;
            }

            yield return null;
        }

        Grounded = true;
    }
*Crossfade는 애니메이션을 조금 더 부드럽게 바꿔주는 역할(지연시간)
참조 :https://docs.unity3d.com/6000.0/Documentation/ScriptReference/Animation.CrossFade.html
Unity - Scripting API: Animation.CrossFade
If the mode is set to PlayMode.StopSameLayer, animations on the same layer as animation are faded out while animation is faded in. if the mode is set to PlayMode.StopAll, all animations are out while animation is faded in. If the animation is not set to be
docs.unity3d.com
마지막은 카메라 세팅이다.
카메라 세팅은 LateUpdate에 쓰는데 이는 Update 함수 뒤에 실행되어
카메라가 캐릭터의 움직임을 따라가게 만들게 하기 위함이다.
LateUpdate()함수 안
목표 위치 ( 카메라가 향할 위치) 를 계산해준다.
우리는 cameraOffset, 캐릭터와 카메라간의 거리 기준이 있으므로
바뀐 위치 + cameraOffset을 해 주면 된다.
카메라 속도와,카메라의 위치를 저장할 변수도 선언해준다.
    var CharPosition = transform.position + cameraOffset;

    float speed = CameraSpeed;

    Vector3 newPosition = Vector3.zero;
만일 떨어지는 상황에서의 속도가 카메라보다 빨라서 플레이어를 담지 못하면 문제가 발생할 수 있다.
이를 방지하기 위해서 Maxdistance보다 거리 차이가 크면, 이동할 위치를 새롭게 계산해준다.
   if (Vector3.Distance(CharPosition, _mainCamera.transform.position) >= MaxDistence)
    {
        Vector3 Gap = ((_mainCamera.transform.position) - CharPosition).normalized * MaxDistance;

        newPosition = CharPosition + Gap;
    }
의문이 든다.
1. 우리가 배웠던 것은 방향 벡터는 일반적으로 목표 위치 - 현재 위치로 계산하는데
여기서는 반대다. 왜 그런 것일까 ?
해석 : 일정 거리 이상 떨어졌을 때, 카메라를 캐릭터와 멀어지는 방향으로 이동시켜 거리를 유지하려는 의도
즉, 너무 빠바박 따라가는 것보다, 떨어지고 있다는 느낌을 강조하는 것.. ? 잘 모르겠다 질문해봐야지.
2. if문은 어떤 역할을 하나 ?
결국 우리는 _mainCamera.transform..position에 new position을 할당하는 작업을 할 것이다.
if 문은 MaxDistace보다 차이가 커지면 그 즉시 거리를 조정하는 역할을 한다.
다음 코드로 넘어가 보자면, else 구문이다.
MaxDistance보다 작을때이므로, 부드럽게 넘어가는 카메라 작업이 필요하다.
else
        {
            newPosition = Vector3.MoveTowards(_mainCamera.transform.position,
                CharPosition,
                speed * Time.deltaTime);
        }
아이템 습득
캐릭터를 이동시켜 아이템을 만나면, 왼쪽 하단에 있는 인벤토리로 날아가게 하는 것을 표현해보자.
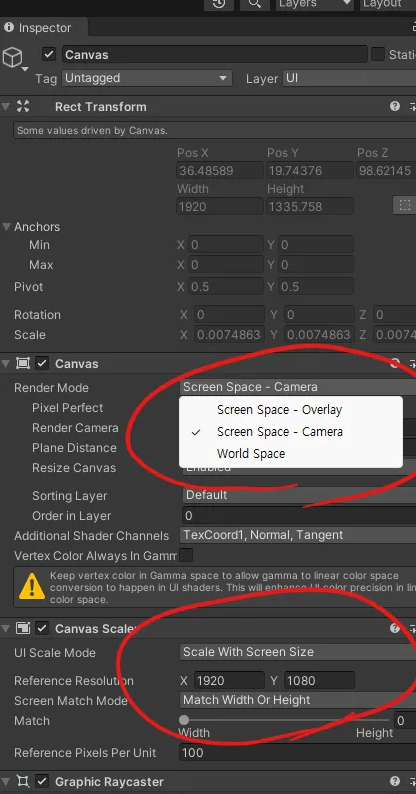
우선, UI를 만들어준다. 버튼에 인벤토리 같은 이미지를 골라 넣어준다.
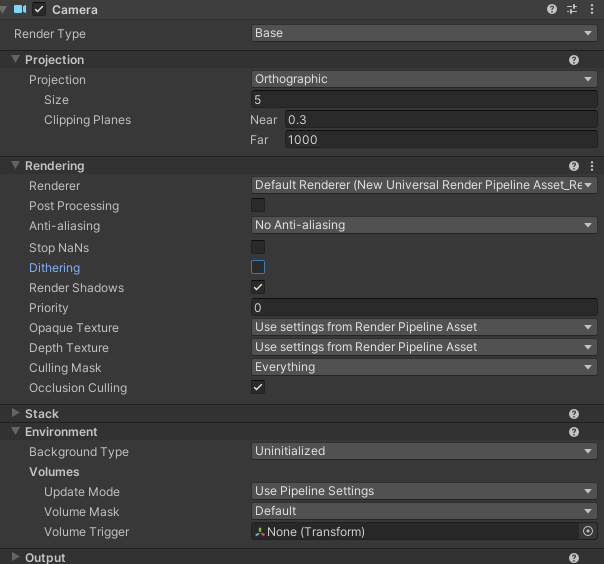
UI(캔버스)를 찍을 카메라도 하나 더 만들어준다.
그리고 아이템 프리팹을 만들어 이미지와 콜라이더를 넣어준다. ( 충돌감지해 넣기 위해)
캐릭터에 아이템 습득 범위를 설정해주기 위해서 게임 오브젝트를 만들고, 캡슐 콜라이더를 넣고
제일 중요한 ItemGetter 스크립트도 함께 넣어준다.
아이템이 먹어지면, 박스로 들어가는 것처럼 보이게 하는 방식은
사실은 아이템을 삭제하고, UI(캔버스) 상의 똑같은 위치에 생성하고 날라가게 하는 것이다.
이를 위해서 삭제(Destroy), 생성(Instantiate), 충돌 감지 (OnTriggerEnter2D) 등의 만들어져 있는 함수와
코루틴으로 박스로 날라가는 기능(GoingToBox) , 박스가 랜덤하게 흔들리는 기능(ShakeAndBake)를 쓸 것이다.
우선, 월드 상에 생성된 아이템을, UI(캔버스) 상의 로컬 좌표로 변환하는 과정은 다음과 같다.
 private void OnTriggerEnter2D(Collider2D other)
    {
        Debug.Log(other);

        var newObject = Instantiate(itemPrefab, other.transform.position, Quaternion.identity, canvas.transform);
        newObject.GetComponent<Image>().sprite = other.GetComponent<SpriteRenderer>().sprite;
        newObject.transform.position = other.transform.position;
        newObject.transform.localScale = new Vector3(100, 100, 100);
        var newScreenPosition = Camera.main.WorldToScreenPoint(newObject.transform.position);
        Vector2 localPoint;
        RectTransformUtility.ScreenPointToLocalPointInRectangle(canvas.GetComponent<RectTransform>(), newScreenPosition, camera, out localPoint);
        newObject.transform.localPosition = localPoint;
*참조 : Instantiate ( 무엇을, 어떤 위치에, 어떤 회전으로 ,부모 오브젝트는 뭘로)
newObject를 생성하고, newObject의 이미지칸에 충돌한 다른 오브젝트의 사진을 넣어준다.
(itemPrefab에 이미지 컴포넌트 넣는 것에 주의)
그리고 충돌한 오브젝트의 위치를 할당해준다.
(Scale은 지금 픽셀 퍼 유닛이 1 : 100이라 키워줬다)
지금 위치는 월드상의 좌표이므로 이를 UI/캔버스 상의 로컬 좌표로 바꿔주어야 한다.
이를 위한 함수가, 우선 WorldToScreenPoint로 screepoint로 변환하고, 또 ScreenPointToLocalPointRectangle로
로컬 좌표로 변환하는 것이다. 이때 ScreenPointToLocalPointRectangle 한정자 out이 있으므로 미리 선언해줘야한다.
그리고 바뀐 로컬 좌표를 newObject에 할당해주면 된다.
*ref, out 참조 :https://www.youtube.com/watch?v=uzDBhNLW4a8
생성한 newOjbect의 위치를 잡아주었으니, 박스 방향으로 옮길 차례이다.
이는 코루틴을 사용해서 해 준다, 왜 ? 옮기는 시간을 설정하고, 특정 상황에서만 작동하는 코드를 작성하기 편하니까 !
총 3가지의 기능을 넣을 것이다.
- 이동하는 기능, newOjbect가 생성된 위치에서 박스쪽으로 이동한다
- Effect, 효과를 넣어줄 것이다. (도착하고 난 뒤)
- 박스가 흔들리는 기능을 넣을 것이다.
1번부터 시작해본다.
시간을 설정해주고, 그 시간이 될 때까지 deltaTime씩 증가하는 변수 t를 설정,
Lerp 함수로 부드럽게 위치를 옮긴다. (초기 위치 > 인벤토리(박스) 위치 yield return null; 로 한 프레임씩 진행한다.
그리고 마지막에는 위치를 박스 위치로 맞춰준다.
IEnumerator GoingTBox(RectTransform itemTransform, RectTransform boxTransform)
    {
        float duration = 1.0f;
        float t = 0.0f;

        Vector3 itemBeginPOS = itemTransform.position;

        while (1.0f >= t / duration)
        {
            Vector3 newPosition = Vector3.Lerp(itemBeginPOS,
                boxTransform.position, t / duration);

            itemTransform.position = newPosition;

            t += Time.deltaTime;
            yield return null;
        }

        itemTransform.position = boxTransform.position;
2번, 간단하게 이펙트도 넣어준다. 이 함수 뒤에 넣으면 자연스럽게 도착하고 이펙트가 발생한다.
 var particle = Instantiate(getEfecctPrefab, boxTransform.position, getEfecctPrefab.transform.rotation);
        particle.transform.localScale = boxTransform.localScale;
들어간 것처럼 보이게 하기 위해 생성한 newObject와 Effect를 파괴한다.
Destroy(itemTransform.gameObject);
        Destroy(particle, duration);
3번, 사실 중간에 코루틴을 한 번 더 사용해서 흔들리는 것을 표현한다. 이펙트는 코루틴을 사용하지 않았으므로, 이펙트 함수 다음에 쓰면 동시에 진행될 수 있다.
IEnumerator ShakeAndBake()
    {
        RectTransform buttonRect = Button.GetComponent<RectTransform>();
        Vector2 originalPosition = buttonRect.anchoredPosition;

        float elapsed = 0;

        while (elapsed < shakeDuration)
        {
            elapsed += Time.deltaTime;
            Vector2 randomOffset = Random.insideUnitCircle * shakeAmount;
            buttonRect.anchoredPosition = originalPosition + randomOffset;

            yield return null;
        }
        buttonRect.anchoredPosition = originalPosition;
    }
알고 보면 코드는 간단하다. (3시간 걸렸다)
버튼의 초기 anchoredPosition을 저장하고, GoinToBox와 비슷하게 시간을 설정해준다.
시간이 우리가 설정한 shakeDuration을 넘을 때까지 originalPosition에서 random한 값을 더해주고 한 프레임 쉬고를
반복하면 된다. 실행이 모두 끝난 후에는 원래 포지션으로 돌려준다.
*참조 : Anchor - UI 요소가 부모 RectTransform의 어느 부분에 고정되어 있을지 결정하는 기준점
anchoredPosition : 부모 RectTransform의 Anchor를 기준으로 UI요소의 중심점이 얼마나
떨어져 있는지를 나타내는 2D좌표.
https://docs.unity3d.com/6000.0/Documentation/ScriptReference/RectTransform-anchoredPosition.html
Unity - Scripting API: RectTransform.anchoredPosition
The Anchored Position is the position of the pivot of the RectTransform taking into consideration the anchor reference point. The anchor reference point is the position of the anchors. If the anchors are not together, Unity estimates the four anchor positi
docs.unity3d.com
그래서 결국 모든 코드를 합치면
using System.Collections;
using System.Collections.Generic;
using Unity.VisualScripting;
using UnityEngine;
using UnityEngine.UIElements;


using Image = UnityEngine.UI.Image;

public class ItemGetter : MonoBehaviour
{
    public RectTransform itemRectTransform;
    public Canvas canvas;
    public GameObject itemPrefab;
    public GameObject getEfecctPrefab;
    public Camera camera;
    public GameObject Button;
    public float shakeDuration = 3.0f;
    public float shakeAmount = 100f;


    // Start is called before the first frame update
    void Start()
    {
    }

    // Update is called once per frame
    void Update()
    {

    }

    IEnumerator GoingTBox(RectTransform itemTransform, RectTransform boxTransform)
    {
        float duration = 1.0f;
        float t = 0.0f;

        Vector3 itemBeginPOS = itemTransform.position;

        while (1.0f >= t / duration)
        {
            Vector3 newPosition = Vector3.Lerp(itemBeginPOS,
                boxTransform.position, t / duration);

            itemTransform.position = newPosition;

            t += Time.deltaTime;
            yield return null;
        }

        itemTransform.position = boxTransform.position;
        var particle = Instantiate(getEfecctPrefab, boxTransform.position, getEfecctPrefab.transform.rotation);
        particle.transform.localScale = boxTransform.localScale;

        StartCoroutine(ShakeAndBake());
        Destroy(itemTransform.gameObject);
        Destroy(particle, duration);

    }

    IEnumerator ShakeAndBake()
    {
        RectTransform buttonRect = Button.GetComponent<RectTransform>();
        Vector2 originalPosition = buttonRect.anchoredPosition;

        float elapsed = 0;

        while (elapsed < shakeDuration)
        {
            elapsed += Time.deltaTime;
            Vector2 randomOffset = Random.insideUnitCircle * shakeAmount;
            buttonRect.anchoredPosition = originalPosition + randomOffset;

            yield return null;
        }
        buttonRect.anchoredPosition = originalPosition;
    }


    private void OnTriggerEnter2D(Collider2D other)
    {
        Debug.Log(other);

        var newObject = Instantiate(itemPrefab, other.transform.position, Quaternion.identity, canvas.transform);
        newObject.GetComponent<Image>().sprite = other.GetComponent<SpriteRenderer>().sprite;
        newObject.transform.position = other.transform.position;
        newObject.transform.localScale = new Vector3(100, 100, 100);
        var newScreenPosition = Camera.main.WorldToScreenPoint(newObject.transform.position);
        Vector2 localPoint;
        RectTransformUtility.ScreenPointToLocalPointInRectangle(canvas.GetComponent<RectTransform>(), newScreenPosition, camera, out localPoint);
        newObject.transform.localPosition = localPoint;
        StartCoroutine(GoingTBox(newObject.GetComponent<RectTransform>(), itemRectTransform));
        Destroy(other.gameObject);
    }
}
ease in out도 있는데 일단 피곤해서 패스...
내일은 운동을 줄이던지 해야지..
'TIL' 카테고리의 다른 글
| [멋쟁이사자처럼 부트캠프 TIL회고] Unity 게임 개발 3기 29일차 (2) | 2024.12.18 |
|---|---|
| [멋쟁이사자처럼 부트캠프 TIL회고] Unity 게임개발 3기 28일차 (1) | 2024.12.17 |
| [멋쟁이사자처럼 부트캠프 TIL회고] Unity 게임개발 3기 25-26일차 (0) | 2024.12.15 |
| [멋쟁이사자처럼 부트캠프 TIL회고] Unity 게임 개발 24일차 (0) | 2024.12.14 |
| [멋쟁이사자처럼 부트캠프 TIL회고] Unity 게임개발 3기 23일차 (1) | 2024.12.12 |