[멋쟁이사자처럼 부트캠프 TIL회고] Unity 게임개발 3기 34일차
오늘은 새로운 2D로 프로젝트를 만들 것이다.
오늘의 목표
1. 화살에 충격을 가해 발사하기
2. 화살 리스폰 기능 추가하기
3. 대기, 발사 애니메이션 추가하기
4. 화살 궤적 표시하기
01. 화살에 충격을 가해 발사하기
3D에서 한 번 끝냈던 작업이기에, 조금은 쉬울줄 알았다.
생각보다 오래걸렸다.
    public Camera Maincam;
    public Vector2 startPos;
    public Vector2 endPos;
    public float maxDistance;
    private Rigidbody2D rb;
    public float power;
    [SerializeField] private LineRenderer line;
    private bool isDragging = false;
점점 늘어나는 변수 선언들, 변수를 먼저 기록하는 것은 생각보다 어려운 것 같다.
그냥 그때그때 쓸 때마다 추가해야지.
public void Start()
{
    rb = GetComponentInChildren<Rigidbody2D>();
}

void Update()
{
    if (Input.GetMouseButtonDown(0))
    {
        OnMouseDown();
    }

    if (Input.GetMouseButton(0))
    {
        OnMouse();
    }

    if (Input.GetMouseButtonUp(0))
    {
        OnMouseUp();
    }
}
처음에 IPointerDownHandler, IPointerUpHandler와 같이 제공되어 있는 인터페이스로 하려다 실패하고,
그냥 내가 익숙한 방식을 채택했다. 만일 또 비슷한 일을 하게 된다면 그 때 도전하려 한다.
전체적인 개요는 인터페이스 방식과 같다. 잡고, 드래그하고, 놓을 때 기능을 각각 추가해서
화살이 드래그한 방향의 반대 방향으로 발사되도록 충격을 줄 것이다.
전체적인 개요는 다음과 같다.
OnMouseDown()
- startPos를 기록
- isDragging을 True로 바꿈
OnMouse()
- 마우스 위치에 따라 변경되는 변수 선언 & 할당
- 마우스 위치부터 startPos까지의 방향을 구함
- LineRenderer로 선을 그음
OnMouseUp()
- 마우스를 놓는 순간의 위치를 기억할 변수 선언 & 할당
- 놓는 순간의 위치부터 startPos까지의 방향을 구함
- 힘을 가해줌
- 라인 삭제( 다른 화살들을 위해)
그렇다면 코드를 보자.
void OnMouseDown()
{
    startPos = Maincam.ScreenToWorldPoint(Input.mousePosition);
    isDragging = true;
}
void OnMouse()
{
    if (isDragging)
    {
        Vector2 currentMousepos = Maincam.ScreenToWorldPoint(Input.mousePosition);
        Vector2 launchDirection = (startPos - currentMousepos);
        if (launchDirection.magnitude > maxDistance)
        {
            launchDirection.Normalize();
            launchDirection *= maxDistance;
            direction = launchDirection;
        }
        else
        {
         direction = launchDirection;
        }

        if (line != null)
        {
            line.positionCount = 2;
            line.SetPosition(0, startPos);
            line.SetPosition(1, startPos + launchDirection);
        }

    }
}
void OnMouseUp()
{
    isDragging = false;
    rb.simulated = true;
    endPos = Maincam.ScreenToWorldPoint(Input.mousePosition);
    Vector2 fireDirection = (startPos-endPos);
    fireDirection.Normalize();
    fireDirection *= power;
    rb.AddForce(fireDirection, ForceMode2D.Impulse);

    if (line != null)
    {
        line.positionCount = 0;
    }
}
간단하게 발사를 구현하였다.
02. 화살 재장전 기능 추가하기
화살을 재장전하는 모션은 따로 존재하지 않아서 화살을 생성하고, 날리기 위해 Rigidbody를 연결한다.
새로운 스크립트 ArrowSpawner에서
1. Start()
CharacterController에서 Action 함수를 받아와 spawnArrow함수를 연결
변수 선언들
2. ArrowSpawn
새 화살 생성(프리팹)
새로 rigidbody를 연결함.
public class ArrowSpawn : MonoBehaviour
{
 public GameObject arrow;
 public Vector3 startPos;
 public Transform spawnPoint;
 private Vector3 initialSpawnPosition;
 private GameObject Player;
 public ShotingDrill shotingDrill;
 private Animator animator;
 void Start()
 {

         shotingDrill = GetComponentInParent<ShotingDrill>();
         shotingDrill.spawnAction += SpawnArrow;
         initialSpawnPosition = spawnPoint.position;
         Player = GameObject.FindGameObjectWithTag("Player");
         animator = GetComponentInParent<Animator>();


 }
 void SpawnArrow()
 {
     GameObject newArrow = Instantiate(arrow, initialSpawnPosition, Quaternion.identity,Player.transform);
     shotingDrill.AssignArrow(newArrow);

 }
}
다음은 CharacterController에 있는 함수
Update 문 안에
if (Input.GetKeyDown(KeyCode.Space))
{
    spawnAction?.Invoke();
}
새로운 함수(재할당)
public void AssignArrow(GameObject newArrow)
 {
     currentArrow = newArrow;
     rb = newArrow.GetComponent<Rigidbody2D>();
     rb.simulated = false;
     rb.velocity = Vector2.zero;
     rb.angularVelocity = 0f;

 }
그리고, 발사하지 않은 채로 계속해서 새로 생성이 불가능하게 다음과 같은 조건을 추가해주었다.
void SpawnArrow()
{
    if (shotingDrill.currentArrow == null)
    {
        GameObject newArrow = Instantiate(arrow, initialSpawnPosition, Quaternion.identity,Player.transform);
        shotingDrill.AssignArrow(newArrow);
    }
}
화살 재장전 문제 해결 !
03. 대기, 장전, 발사 애니메이션
애니메이션을 적절히 섞어서 만들어준다.
코루틴을 거는 방법 등을 통해, 딱 발사를 하고 화살이 나가게 하려 했지만,
능력 부족으로 실패했다. 이건 다음 시간에 멘토님께 물어볼 예정 !!
대기, 장전, 발사를 추가한 코드 부분이다.
void OnMouse()
    {
        if (isDragging && currentArrow != null)
        {
            Vector2 currentMousepos = Maincam.ScreenToWorldPoint(Input.mousePosition);
            Vector2 fireDirection = (startPos - currentMousepos);
            if (fireDirection.magnitude >= maxDistance)
            {
                fireDirection.Normalize();
                fireDirection *= maxDistance;
                direction = fireDirection;
            }
            else
            {
             direction = fireDirection;
            }
            direction *= power;

            if (line != null)
            {
                line.positionCount = 2;
                line.SetPosition(0, startPos);
                line.SetPosition(1, startPos + fireDirection);
            }
          Trajectory(firePoint, direction);
          animator.SetBool("HoldStart",true);
        }
void OnMouseUp()
{
    if (currentArrow == null  || !isDragging) return;
    isDragging = false;
    if (rb == null) return;
    rb.simulated = true;
    endPos = Maincam.ScreenToWorldPoint(Input.mousePosition);
    Vector2 fireDirection = (startPos-endPos);
    if (fireDirection.magnitude >= maxDistance)
    {
        fireDirection.Normalize();
        fireDirection *= maxDistance;
    }
    fireDirection *= power;

    animator.Play("BowAttack");
    audioSource.Play();
    rb.AddForce(fireDirection, ForceMode2D.Impulse);

    if (line != null)
    {
        line.positionCount = 0;
    }

    rb = null;
    currentArrow = null;
   ClearTrajectory();

   animator.SetBool("HoldStart",false);
}
원래 방식은 Animator를 가져와서 Play만 해 주었는데, 특정 애니메이션 상태에서 멈추게 하기 위해서
transition방식을 적용했다.
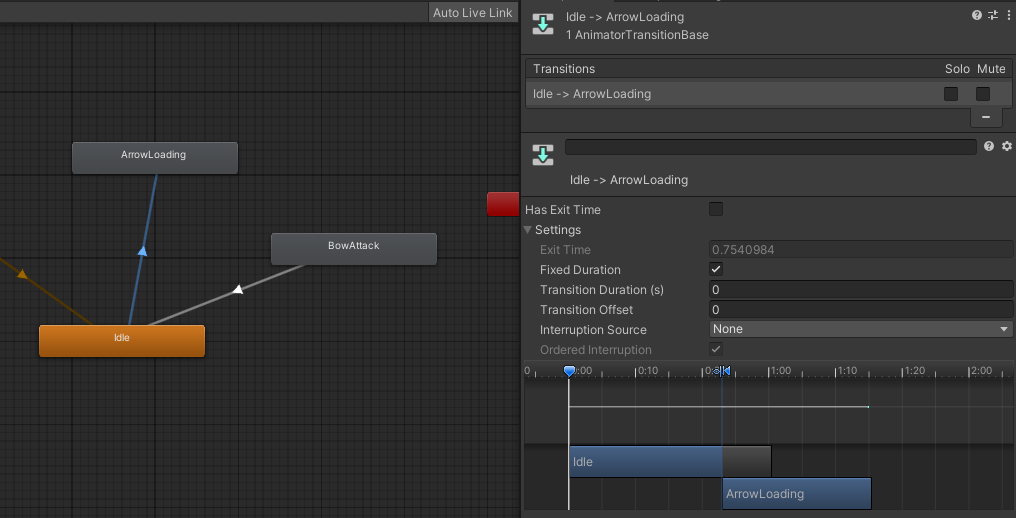
Transition setting도 잊지 말기.
04. 화살 궤적 표시하기
사실 한 번 해본 것이라 조금 쉬울줄 알았는데 한참 걸렸다.
왜 ? 전에는 위아래로 움직이는 대포에서 궤적을 표시하는 것이라 당기는 지점 , 발사 지점을 구분할 필요가 없었는데
이번에는 구분해야 했기 때문이다. ( 활의 발사지점에서 당기면 포지션이 너무 제한되는 문제)
그리고, 다른 분의 코드를 슬쩍 참고했는데 도움은 많이 되었지만 내 방식을 추가하다 보니 조금 꼬여서 오래걸렸다..ㅎ
궤적을 나타내는 Trajectory()
1. 시작지점(firePos)와 발사 방향(fireDirection)을 받아와야 한다.
2. timeStep, 점을 찍을 시간을 정의한다.
3. 점들을 하나하나 물리 공식을 적용한 위치에 찍고, Dots List에 저장한다.
4. Dots List를 활성화한다.
그리고 발사가 완료되면, Dots List를 비활성화 해준다.
private void Trajectory(Vector2 firePoint, Vector2 fireDirection)
{
    Vector2 gravity = Physics2D.gravity;
    float timeStep = Time.fixedDeltaTime;

   // Vector2 previousPoint = firePoint;

    for (int i = 0; i < maxDots; i++)
    {
        float t = i * timeStep;
        Vector2 currentPoint = firePoint + fireDirection * t +0.1f * gravity * t * t;

        if (i >= dots.Count)
        {
            GameObject dot = Instantiate(trajectoryDotPrefab, currentPoint, Quaternion.identity,Spawner.transform);
            dot.transform.localScale = Vector3.one*2;
            dots.Add(dot);
        }
        else
        {
            dots[i].transform.position = currentPoint;
            dots[i].SetActive(true);
        }
    }
}
계속해서 생성하고 지우는 것은 비효율적이기 때문에, Object Pooling을 살짝 응용해봤다.
3번 맞으면 부서지는 오브젝트까지 추가하여 지금까지 만들어진 게임은 이렇다.
도중 발생했던 문제들
1 . 화살과 표적이 충돌하지 않는 문제가 발생
저번에도 그랬던 거지만, 3D로 무언가를 하나 만들고 나니까 iskinematic이랑 개념이 좀 섞였던 것 같다.
simulated는 isKinematic처럼 외부 물리의 영향을 받지 않겠다 , 나는 충돌 체크만 하는 오브젝트다 ! 가 아니라
2D 시뮬레이션을 통해 움직이는 것(중력, 물리적용), 리지드바디2D, 콜라이더 2D가 모두 작동하는 것을 말한다.
반대로 simulated를 비활성화 하면 리지드마디가 시뮬레이션에 의해 움직이지 않고, 모든 콜라이더가 파괴된다.
즉, 우리는 simulated를 켜서 충돌을 켜 주어야 한다.
2. 발사체와 궤적이 다름
제일 고생했던 문제다.
분명 같은 힘을 넣었는데 왜 Trajectory로 생성되는 궤적과 발사 궤적이 다를까.. ?
라고 생각하고 약 한 시간 반 걸려서 해결한 것처럼 보였지만, 공식을 다시 찾아보니
공식이 틀렸었다... ㅠㅠㅠㅠㅠㅠ
고친줄 알았던 이유는 , 내 문제가 t 값을 t = i x timeStep * 25 라고 설정했었는데
25를 곱해서 문제가 생긴 줄 알고 지웠다.
그러면 매우 짧은 범위 안에서 생성되기 때문에 중력의 힘을 덜 받고, 비슷할 수 밖에 없다.
또, timeStep을 fixedUpdate와 주기를 맞춰 주었었는데 이도 사실 상관 없는 일이었다.
그냥 포물선 공식에서 0.5를 곱해주어야 하는 것을, 0.1을 곱해서 생긴 문제였다.
막상 코드를 짤 때에도, timpStep에 어쩌피 i 값을 곱해주니, 간격에 관한 문제이지 fixedUpdate의
주기를 맞춰주건, 상수를 곱해주건 상관이 없어야 하는 것이 아닌가 ? 하는 생각이 계속해서 들었지만
일단 되니까 넘어가다가, 후에 이렇게 후기 작성할 때에 이상해서 찾아보니 알게 되었다.
회고의 중요성 +1
그래서 따로 포스팅에 기본적으로 알아두면 좋은 물리 공식들을 정리해두려 한다.
아무튼 그래서 생성된 새로운 Trajectory 함수이다.
private void Trajectory(Vector2 firePoint, Vector2 fireDirection)
{
    Vector2 gravity = Physics2D.gravity;
    float timeStep = Time.fixedDeltaTime;

   // Vector2 previousPoint = firePoint;

    for (int i = 0; i < maxDots; i++)
    {
        float t = i * timeStep * 5;
        Vector2 currentPoint = firePoint + fireDirection * t +0.5f * gravity * t * t;

        if (i >= dots.Count)
        {
            GameObject dot = Instantiate(trajectoryDotPrefab, currentPoint, Quaternion.identity,Spawner.transform);
            dot.transform.localScale = Vector3.one*2;
            dots.Add(dot);
        }
        else
        {
            dots[i].transform.position = currentPoint;
            dots[i].SetActive(true);
        }
    }
}
3. 세 번의 화살이 한 번에 표적에 박히는 문제
우선 표적의 스크립트 먼저 보고 가자.
using System;
using System.Collections;
using System.Collections.Generic;
using UnityEngine;

public class targetObject : MonoBehaviour
{
    private AudioSource audioSource;
    private LayerMask layerMask;
    public GameObject studdedArrow;
    private float hitCounter;

    private void Start()
    {
        audioSource = GetComponent<AudioSource>();
    }

    void Update()
    {
        if (hitCounter >= 3)
        {
            Destroy(this.gameObject);
        }
    }

    void OnCollisionEnter2D(Collision2D collision)
    {
        if (collision.gameObject.layer == LayerMask.NameToLayer("Arrow"))
        {
            audioSource.Play();
            Debug.Log(collision.gameObject.name);
            Destroy(collision.gameObject);
            GameObject newArrow = Instantiate(studdedArrow, collision.contacts[0].point, Quaternion.identity);
            hitCounter++;
            Debug.Log(hitCounter);
        }
    }
}
3번 맞으면 부서지고, Layer가 Arrow면 충돌을 감지해 새로운 화살이 박힌 모습을 표현한다.
분명 OncollisionEnter2D로 했는데 왜 한 발에 세 번 충돌하지.. ? 라는 생각을 하며
화살 50번을 쏴 봤다.
세 번이 한꺼번에 발사됨 (왜 ?????)
애니메이션 당기는 상태 유지

약 50회의 발사를 하던 중, 1 번만 발생했다.
영상으로 찍어 남기기 위해 영상을 찍어봤다.
동영상을 찍기 전까지는 몰랐다, 화살이 튕겨서 다시 표적에 닿은 것이었다.
그래서 닿은 물체를 Destroy함수로 부수며 문제를 해결했다.
이렇게 쓰고 보니 정말 다시 만들라고 하면 3시간이면 제작하겠지만, 나름 할 때는 최선을 다했다...
점차 실력이 늘게 되겠지... ?
더 추가해야 할 것들
- 카메라 이동(날아가는 화살을 따라가게 함)
- 난이도 조절 : 움직이는 새 맞추기, 과녁 이동시키기, 멀리 있는 물체 맞추기
- 배경음악 추가
- 미니맵 추가
추가하면 좋은 것들
- 터지는 오브젝트
- 이펙트
- 다른 이동하는 몬스터나 오브젝트들
일단 추가해야 하는 것들을 필수로 추가하고, 시간이 남으면 다른 것들을 해야겠다.